2-Cycle Small Engine Carburetor Adjustment Why and How
Welcome to our blog post on small engine carburetor adjustment. Even if you have a brand new carburetor, it often requires adjustment. There are various factors that contribute to the need for adjustment, such as different applications, temperature variations, altitude differences, and fuel variations. In this article, we will delve into why carburetors require adjustment and provide step-by-step guidance on how to adjust them correctly.

Understanding the Need for Carburetor Adjustment
Even with a brand new carburetor, adjustments are often necessary due to various factors affecting engine performance. For example, consider the different requirements of choke opening at sea level compared to high-altitude regions like Colorado's mountain areas. Furthermore, seasonal changes can impact combustion conditions. Equipment used in scorching summers may require adjustment when used again in frigid winters. These variations highlight the need to fine-tune the carburetor to adapt to changing environmental conditions and achieve optimal engine performance.

The Functioning of a Carburetor
To comprehend carburetor adjustment, it's crucial to understand how it works. We'll use the analogy of a spray bottle to illustrate the mechanism. The carburetor combines air and fuel in proper ratios, ensuring efficient combustion. By manipulating the throttle and adjusting fuel flow, the carburetor controls engine speed and power output.

Understanding Carburetor Adjustment
To effectively adjust the carburetor, it's vital to grasp the concepts of lean, stoic, and rich conditions. A lean condition occurs when there is insufficient air in the air/fuel mixture. This often leads to higher temperatures, potential engine knocking, and poor overall performance. On the other hand, a stoic condition indicates that the ratio of fuel and air is ideal for efficient combustion. Lastly, a rich condition means there is an excess amount of fuel in the mixture, potentially resulting in incomplete combustion, fouled spark plugs, and decreased power output.

When the carburetor is running lean, you might notice symptoms such as the engine hesitating or sputtering, backfiring, or a high-pitched popping sound from the exhaust. On the contrary, a rich carburetor condition could result in black smoke emissions, sluggish acceleration, fouling of spark plugs, and even a strong smell of unburned fuel.
By understanding these observable phenomena associated with lean and rich conditions, you can make informed adjustments to achieve the optimal air/fuel mixture for your specific operating conditions.
Step-by-Step Carburetor Adjustment Guide
When it comes to adjusting the carburetor, it's essential to locate and understand the fuel/air mixture adjustment screws. These screws control the flow of fuel and air to achieve the optimal mixture. Typically, you will find two screws labeled H and L (sometimes marked as High and Low) near the base of the carburetor.

The H screw, often referred to as the high-speed screw, controls the fuel flow in the higher RPM range. It fine-tunes the mixture when the engine is operating at full throttle or under load. On the other hand, the L screw, known as the low-speed screw, regulates the fuel flow at idle or lower RPMs.
To adjust the fuel/air mixture, start by identifying the screws' locations on your specific carburetor. The H and L screws are usually identified by small markings or letters engraved next to them. Using a screwdriver designed for carburetor adjustments, turn these screws clockwise to lean the mixture (reduce fuel) or counterclockwise to enrich the mixture (increase fuel).
It's important to note that the H and L designations indicate the optimal starting point for adjustment, known as the baseline settings. They don't represent fully closed or fully open positions. Starting with these baseline settings ensures a safe and reliable starting point for fine-tuning your carburetor's performance.
Remember, the adjustments should be made gradually, testing the engine's performance after each change. Observe the effects on the engine's sound, responsiveness, and exhaust emissions. Fine-tune the screws until you achieve smooth acceleration, steady idle, and minimal smoke from the exhaust.
By understanding the functions of the fuel/air mixture adjustment screws and their locations on the carburetor, you can confidently make precise adjustments tailored to your specific engine and operating conditions.
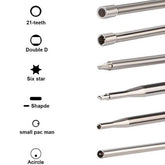
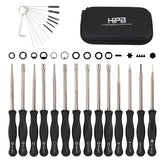
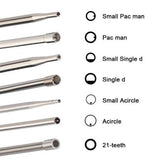
Mastering carburetor adjustment is crucial for optimizing small engine performance. Whether it's addressing different environmental factors or fine-tuning the air / fuel mixture, understanding and implementing proper adjustment techniques are essential. To assist you in this process, we recommend the Hipa carburetor adjustment tool kit. With 14 different screw heads designed to fit various carburetor brands, this toolkit provides convenience and accuracy for your carburetor tuning needs. Get ready to enhance your engine's performance with precision carburetor adjustment!


2 Comments
I replaced the carb on my 2 stroke trimmer and it only runs with the H jet turned all the way in. It is also hard to start.