


How To Install A Snow Blower Carburetor On Tecumseh Engines

Here is a step-by-step instruction on how to install a carburetor on your snow blower with a Tecumseh engine between 8 to 11 horsepower.
How To
Step 1: You can start with popping off the choke knob. You need to remove the screws that hold the cover.
Step 2: Disconnect the wires that go to the key on the snow blower. You need to loosen up the Phillips crew first and then the wires should come off. Usually, you also need to remove both screws that hold the bracket. Now you are supposed to take the whole cover off with the bracket.
Step 3: Remove the bracket. You are going to need to get the cover past the choke shaft and just pull it out. Then you should be able to take off the screws that hold the bracket to the carburetor as well as the screws from the cover. You are going to have the bracket off so you can put it on a new carburetor.
Step 4: Disconnect the primer line and take off the screws that each one has a nut at the end of it with a Phillips screwdriver.
Step 5: Now you can undo the carburetor that is just lightly stuck on the machine. Then you need to reach down and undo the fuel clip by using a good pair of pliers. Use a slotted screwdriver and just back off the fuel line, if the colon is in pretty back shape, the fuel lines need to be replaced obviously.
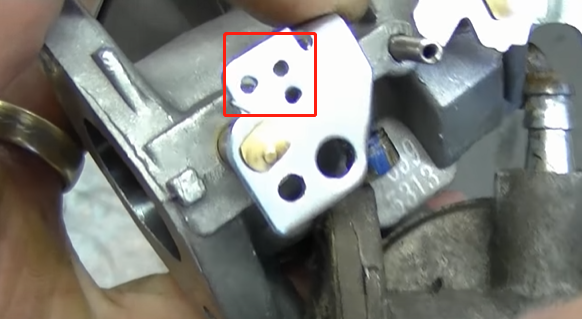
When you replace a carburetor on a snow blower, you should pay attention to the hole where the linkage is in.
Step 6: Remove the carburetor from the linkage. It is very easy you just need to tip it up and then it is going to come out. One thing that is extremely important when you replace a carburetor is not to bend the linkages. If you end up accidentally bending the linkages, your engine may run too slow or too fast.
Step 7: Before you install the new carburetor, you have to remove the choke assembly from the old carb and install it in the new one, and make sure it works. By the way, you can also replace the fuel line and the primer line.
Step 8: You need to retrieve the linkage and install it into the little hole on the new carb.
Now you want to make sure you install the gasket between the carburetor and the adapter. Then put that nut screw back on so that it is not fallen off when you install the carb. And reconnect the fuel line and make sure the fuel line is installed flush to the carb and then install the fuel clamp.
Step 9: Put all things back on.
HIPA CARBURETOR KIT
DIY with 1,000,000+ Hipa members to get your machine up and running like new again, once and for all.
Please let us know if this works and if you have any suggestions or comments. Or you can join HIPA DIY COMMUNITY to feature your passion for repair projects, share your stories with the Hipa family and get help from Hipa.


2 Comments
Кладбищенские букеты Сразу к разделу Все о композициях на кладбище Онлайн?магазин декоративных композиций в северной столице Поморья Цветы на могилу Онлайн?магазин искусственных растений в Архангельске и области Премиальный онлайн?бутик искусственных цветов и интерьерной флористики. Доставляем по Архангельску Искусственные букеты роз для места памяти в Камышине (доставка онлайн) через интернет Категории товаров Монобукеты, плети и листовые ветки Крупные напольные композиции и настольные композиции в контейнерах Сезонные коллекции: весенние, летнего цикла, осеннего цикла, зимнего цикла Состав: шелковые волокна, латекс, велюр, EVA?пеноматериал, консервированный мох Палитры: приглушённые, насыщенные, бренд?палитры Чем мы лучше Натуральная фактура и UV?стойкие тона Износостойкость и лёгкость обслуживания Отсутствие запахов и безопасный состав, соответствует требованиям HoReCa Дизайн?разработка оформлений под ваш интерьер и бренд Гарантия качества и понятные правила возврата Корпоративным клиентам Полный цикл декора для бизнес?локаций. Комплексная декорация событий, регулярное обслуживание композиций, оптовые поставки для декор?студий и ритейла во Архангельске и по всей Архангельской области. Как получить заказ Курьер по Архангельску и соседним районам Логистические операторы по Архангельску и области Онлайн?платежи, счёт для юрлиц, депозитная оплата при спец?заказах Как заказать Откройте каталог и выберите позицию: композиции, аксессуары, композиции Положите в корзину, затем укажите адрес по Архангельску или самовывоз Завершите оформление, и наш менеджер свяжется для уточнения Для корпоративных запросов отправьте ТЗ и бренд?гайд — предоставим презентацию и бюджет Уникальные композиции Создадим макет и состав под ваше пространство: габариты, палитра, стиль (минимализм, классика, эклектика). Анализируем параметры площадки на объекте, стандарты и нагрузочные сценарии. Советы по уходу Лёгкая чистка: щётка с мягким ворсом и мягкая салфетка Избегайте прямого солнца для стойкости палитры Периодически переставляйте композиции, для равномерного освещения Держим складской запас, точные сроки и сопровождение. Ваши объекты в городе сохранят идеальный вид каждый день. Навигация Авторские искусственные композиции — премиальные декоры г. Сасово <Интернет-магазин декоративных цветов Минеральные Воды Интернет-магазин с искусственными цветами в Кинешме> Каталог искусственных цветов Приветствуем! Мы обслуживаем город: Ужур. Оказываем услуги полного цикла: анализ, проектирование, сопровождение и развитие. Рекомендуем посмотреть:
[url=https://rusrose.ru/iskus-cvety-arhangelsk-552/]реалистичные букеты, ветки и зелень — Архангельск[/url]
|
Подробнее по ссылке: [url=]декоративные букеты и растения[/url]
|
Полезная ссылка: https://rusrose.ru/iskus-cvety-arhangelsk-552/ (дополнительная информация) Если у вас есть вопросы — пишите, рады подсказать.
Композиции для кладбища Сразу к разделу Все о цветах на месте памяти Искусственные букеты — интернет-магазин в Архангельске Цветы на кладбище Онлайн?магазин декоративных растений в Архангельске Премиальный интернет?бутик искусственных цветов и декора. Доставляем по городу Архангельску Искусственные соцветия роз для могилы в Камышине онлайн Что у нас есть Монобукеты, лианы и листовые ветки Крупные напольные композиции и мини?композиции в горшках Сезонные коллекции: весенние, summer, осенние, зимние Состав: высококлассный шелк, латекс, бархатистый велюр, этиленвинилацетат, консервированный мох Палитры: пастельные, контрастные, бренд?палитры Чем мы лучше Реалистичная текстура и невыгорающие оттенки Долговечность и простота ухода Нейтральный аромат и безопасный состав, подходит для HoReCa Проектирование композиций под ваш бренд и бренд Гарантия качества и понятные правила возврата Для бизнеса Полный цикл декора для бизнес?локаций. Комплексная декорация событий, регулярное обслуживание композиций, оптовые поставки для флористических студий и торговых точек во г. Архангельск и по всей Архангельской области. Как получить заказ Доставка курьером по г. Архангельск и ближним населённым пунктам Транспортные компании по Архангельской области Оплата онлайн, счёт для юрлиц, аванс при спец?заказах Оформление заказа Откройте каталог и выберите позицию: композиции, аксессуары, наборы Положите в корзину, укажите адрес доставки в г. Архангельск или доставку по городу Завершите оформление, и наш менеджер свяжется для уточнения B2B?клиентам отправьте ТЗ и бренд?гайд — предоставим презентацию и бюджет Кастомные проекты Разработаем уникальные решения под ваше пространство: габариты, палитра, стиль (минималистичный, классика, эклектика). Учитываем параметры площадки в Архангельске, гайдлайны и условия использования. Советы по уходу Уход без хлопот: щётка с мягким ворсом или мягкая салфетка Оберегайте от UV для сохранения цвета Периодически переставляйте композиции, чтобы освежить экспозицию Стабильное наличие, оперативные отгрузки и экспертную поддержку. Интерьеры в Архангельске будут выглядеть безупречно каждый день. География Авторские искусственные композиции — премиальные декоры г. Сасово <Интернет-магазин декоративных цветов г. Минеральные Воды Онлайн?бутик флористики в Кинешме> Мир искусственной флористики Здравствуйте! Наш офис в городе: Ростов-на-Дону. Выполняем весь спектр работ: аудит, создание, поддержку и продвижение. Обратите внимание:
[url=https://rusrose.ru/iskus-cvety-arhangelsk-552/]реалистичные букеты, ветки и зелень — Архангельск[/url]
|
Детали по адресу: [url=]цветочные композиции для интерьера[/url]
|
Полезная ссылка: https://rusrose.ru/iskus-cvety-arhangelsk-552/ (перейти) Задавайте вопросы — поможем, рады подсказать.